Monday 11 September 2017

Voltage Divider

Voltage Divider, in fact is a fundamental circuit in the field of electronics which can produce a portion of its input voltage as output. It is formed using two resistors or any passive components and a voltage source. The resistors are connected in series here and the voltage is given across these two resistors. This circuit is also termed as potential divider. The input voltage is distributed among the resistors (components) of the voltage divider circuit. As a result, voltage division takes place.

Circuit of Voltage Divider

As we mentioned above, two series resistors and voltage source constitutes a simple voltage divider. This circuit can be formed in several ways as shown below. circuit of voltage divider In the above figure, (A) represents shorthand, (B) represents longhand and (C) and (D) shows the resistors in different and same angle respectively. But all the four circuits are in effect the same. R1 is the resistor which is always close to the input voltage source and R2 is the resistor which is near to the ground. Vout is the voltage drop across the resistor, R2. It is actually the divider voltage which we get from this circuit as the output.

Equation of Voltage Divider in Unloaded Condition

The simple voltage divider circuit with reference to ground is shown in the figure below. Here, two electrical impedances (Z1 and Z2) or any passive components are connected in series. The impedances may be of resistors or inductors or capacitors. The output of the circuit is taken across the impedance, Z2. equation of voltage divider in unloaded condition Under open circuit output condition; that is there will be no current flow in the output side, then Now we can prove the output voltage equation (1) using the basic law, Ohm’s Law . Substitute equation (4) in (3), we get So, the equation is proved.
The transfer function of the above equation is This equation is also called as Divider’s The capacitive divider circuits never allow DC input to pass. They work on AC input.
For Inductive divider with non-interacting inductors, the equation becomes The inductive divider divides the DC input analogous to resistor divider circuit depending on resistance and it divides AC input with regard to the inductance.
A basic Low-pass RC filter circuit is shown below which comprises of a resistor and capacitor. low pass rc filter C → Capacitance
R → Resistance
XC → Reactance of the capacitor
ω → Radiant frequency
j → Imaginary unit
Here, the divider’s voltage ratio is RC → Time constant of the circuit represented as τ.

Voltage Divider Under Loaded Condition

Now, we can see the voltage divider circuit in loaded condition. Here, the resistors (R1 and R2) are taken for simplicity. A resistor (RL) is connected across the output. Then the equation becomes, R2 and RL are parallel to each other. The circuit with loaded condition is shown below. voltage divider circuit with loaded condition

Applications of Voltage Divider

Applications include Logic level shifting, Sensor measurement, High voltage measurement, Signal Level Adjustment. The measuring instruments such as Multimeter and Wheatstone bridge consist of voltage divider. Resistor voltage divider is usually used to generate reference voltages or for decreasing the magnitude of the voltage for the ease of measurement. In addition to this; at low frequency, it can be function as signal attenuators. In the case of DC and very low frequencies, the resistor voltage divider is suitable. Capacitive voltage divider is implemented in power transmission for high voltage measurement and to compensate load capacitance.

Voltage Drop Calculation

Voltage drop means the reduction in voltage or voltage loss. Due to the presence of the impedance or passive elements, there will be some loss in voltage as the current moves through the circuit. That is, the energy supplied from the voltage source will get reduced as the current flows through the circuit. Too much voltage drop may result in damage and improper function of the electrical and electronics apparatus. Basically, the voltage drop calculation is done by Ohm’s law.

Voltage Drop in Direct Current Circuits

In direct current circuits, the reason for voltage drop is the resistance. For understanding the voltage drop in DC circuit, we can take an example. Assume a circuit which consist of DC source, 2 resistors which are connected in series and a load. Here; every elements of the circuit will have certain resistance, they receive and lose energy to some value. But the deciding factor of the value of energy is the physical features of the elements. When we measure the voltage across the DC supply and first resistor, we can see that it will be less than the supply voltage. The energy used by each resistance can be known by measuring the voltage across individual resistors. While the current flows through the wire starting from the DC supply to first resistor, some energy that is given by the source get dissipated owing to the conductor resistance. To verify the voltage drop, Ohm’s law and Kirchhoff’s circuit law are used which are briefed below.
Ohm's law is represented by V → Voltage Drop (V)
R → Electrical Resistance (Ω)
I → Electrical Current (A)
For DC closed circuits, Kirchhoff’s circuit law is also used for voltage drop calculation. It is as follows:
Supply Voltage = Sum of voltage drop across each component of the circuit.

Voltage Drop Calculation of a DC Power Line

Here, we are taking an example of 100 ft power line. So; for 2 lines, 2 × 100 ft. Let Electrical resistance be 1.02Ω/1000 ft and current be 10 A.

Voltage Drop in Alternating Current Circuits

In AC circuits; in addition to Resistance (R), there will be a second opposition for the flow of current – Reactance (X) which comprises of XC and XL. Both X and R will oppose the current flow also the sum of the two is termed as Impedance (Z).
XC → Capacitive reactance
XL → Inductive reactance The amount of Z depends on the factors such as magnetic permeability, electrical isolating elements and the frequency of AC.
Similar to Ohm's law in DC circuits, here it is given as E → Voltage Drop (V)
Z → Electrical Impedance (Ω)
I → Electrical Current (A) voltage drop in alternating current circuits 
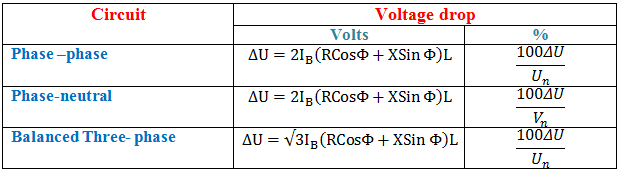
IB → Full load current (A)
R → Resistance of the cable conductor (Ω/1000ft)
L → Length of the cable (one side ) (Kft)
X → Inductive Reactance (Ω/1000f)
Vn → Phase to neutral voltage
Un → Phase to phase voltage
Φ → Phase angle of load

Circular Mils and Voltage Drop Calculation

Circular mil is really a unit of area. It is used for referring the circular cross sectional area of the wire or conductor. The voltage drop using mils is given by 
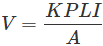
L → Wire length (ft)
K → Specific Resistivity (Ω-circular mils/foot).
P → Phase constant = 2 meant for single phase
” = 1.732 meant for three phase
I → Area of the wire (circular mils)

Voltage Drop Calculation of Copper Conductor from Table

The voltage drop of the copper wire (conductor) can be found out as follows: f is the factor we get from the standard table below.
SIZE OF COPPER CONDUCTOR
FACTOR, f
AWGMM2SINGLE PHASETHREE-PHASE
142.080.4760.42
123.310.3130.26
105.260.1960.17
88.370.1250.11
613.30.08330.071
421.20.05380.046
3 0.04310.038
233.60.03230.028
142.40.03230.028
1/053.50.02690.023
2/067.40.02220.020
3/085.00.0190.016
4/0107.20.01610.014
250 0.01470.013
300 0.01310.011
350 0.01210.011
400 0.01150.009
500 0.01010.009

Working Principle of a Tube Light

What is Tube Light?

Tube shaped fluorescent lamp is termed as tube light. Tube light is a lamp that works on low pressure mercury vapor discharge phenomenon and converts ultra violate ray into visible ray with the help of phosphor coated inside glass tube.

Material Used Inside the Tube Light

The materials used to build a tube light are given below.
  1. Filament coils as electrodes
  2. Phosphor coated glass bulb
  3. Mercury drop
  4. Inert gases (argon)
  5. Electrode shield
  6. End cap
  7. Glass stem
material used in fluorescent lamp

Auxiliary Electrical Components along with Tube Light

The tube light does not work directly on power supply. It needs some auxiliary components to work. They are-
  • Ballast: It may be electromagnetic ballast or electronic ballast.
  • Starter: The starter is a small neon glow up lamp that contains a fixed contact, a bimetallic strip and a small capacitor.
auxiliary electrical components along with tube light

Working Principle of Tube Light

  • When the switch is ON, full voltage will come across the tube light through ballast and fluorescent lamp starter. No discharge happens initially i.e. no lumen output from the lamp.
  • At that full voltage first the glow discharge is established in the starter. This is because the electrodes gap in the neon bulb of starter is much lesser than that of inside the fluorescent lamp.
  • Then gas inside the starter gets ionized due to this full voltage and heats the bimetallic strip that is caused to be bent to connect to the fixed contact. Current starts flowing through the starter. Although the ionization potential of the neon is little bit more than that of the argon but still due to small electrode gap high voltage gradient is appeared in the neon bulb and hence glow discharge is started first in starter.
  • As voltage gets reduced due to the current causes a voltage drop across the inductor, the strip cools and breaks away from the fixed contact. At that moment a large L di/dt voltage surge comes across the inductor at the time of breaking.
  • This high valued surge comes across the tube light electrodes and strike penning mixture (mixture argon gas and mercury vapor).
  • Gas discharge process continues and current gets path to flow through the tube light gas only due to low resistance as compared to resistance of starter.
  • The discharge of mercury atoms produces ultra violet radiation which in turn excites the phosphor powder coating to radiate visible light.
  • Starter gets inactive during operation of tube light.

Wiring Diagram for a Single Tube Light Circuit


Image result for TUBE LIGHT connection diagram


Wiring components 
 Tube Light is not connected in the supply main directly. Although it operates at 230 V ,50 Hz, some auxiliary electrical components are used to insert in this installation to support the tube light operational principle. The total electrical components for single tube light installation are
  1. Choke: it is electromagnetic ballast or electronic ballast.
  2. Starter: Small neon glow up lamp
  3. Switch
  4. Wires

Wiring Diagram of Single Tube Light Installation with Electromagnetic Ballast

wiring diagram of single tube light installation with electromagnetic ballast

How to Install a Single Tube Light with Electromagnetic Ballast

  • From the junction box the neutral wire is not taken out to the switch board, rather it is taken out from the junction box and carried out to the port 2 of the tube light, as per figure above. A wire connects port 2 and pin 1 of the terminal 2 already. So the neutral wire is continued from port 2 to pin 1 of terminal 2.
  • The live wire or phase is taken from the junction box to the switch board. The live wire is connected to the one terminal of the switch. From another terminal of the switch the wire is carried out up to tube light set up and connected to port 1.
  • One terminal of choke or ballast is connected to port 1 and another terminal is connected to pin 1 of terminal 1.
  • One end of a starter is connected to pin 2 of terminal 1 and another end of the starter is connected to the pin 2 of terminal 2.
Wiring Diagram of Single Tube Light Installation with Electronic Ballast Wiring diagram of single tube light installation with electronic ballast

How to Install a Single TubeLight with Electromagnetic Ballast

  • As no starter is used in case of electronic ballast application, wiring diagram is little bit changed.
  • Electronic ballast has six ports, two ports out of six ports are for input and rest four ports are for output ports. Suppose they are named port 1 and port 2 for input; port 3, port 4, port 5 and port 6 are for output of the ballast.
  • From the junction box the neutral wire is taken out from the junction box and carried out to the port 2 of the electronic ballast to connect, as per figure above.
  • The live wire or phase is taken from the junction box to the switch board. The live wire is connected to the one terminal of the switch. From another terminal of the switch, the wire is carried out up to tube light set up and connected to port 1 of the electronic ballast.
  • Let, the color of wires from port 3 and port 4 are black, and from port 5 and port 6 are red or any other color.
  • Port 3 and pin 2 of terminal 1 and Port 4 and pin 1 of terminal 1 are connected.
  • Port 6 and pin 2 of terminal 2 and Port 5 and pin 1 of terminal 2 are connected.
[NB: incoming voltage of port 1 and port 2 of the electronic ballast is only 230 V, 50 Hz. But output ports 3, 4, 5 and 6 give very high voltage at the time of switch ON, may be 1000 V at 40 kHz or more. When tube light starts to operate, output ports voltages become below 230 V at 40 kHz or more.] 

Distribution Board Wiring For Single Phase Wiring

When we start a project of electrical wiring the first and the main control point of wiring is distribution board. Distribution board wiring is very important for controlling the E wiring. For this post i designed a diagram about distribution wiring, we can called this circuit breaker or controlling fuse box. In the diagram is shown the method of wiring distribution main board form utility pole to Energy meter and then DP circuit breaker and SP MCB breaker.
However we study all step by step distribution board wiring below, as we talking about the distribution main board diagram, first see this.


How to Distribution Board Wiring for Single phase Wiring with Dp MCB, sp mcb, earth, voltmeter, ammeter for Home wiring

In the above diagram i shown the complete method of wiring, i wired an energy meter after that a double pole and then single pole breakers for each room or each point of circuit load. The main reason of this board in E wiring is that we can control the complete wiring form this place. That's why we can called him the main circuit breaker box. In above image i provide the complete instruction which needed however lets do study some parts with details.

Also read.
How to wire circuit box for different load?
So lets disuse the distribution board wiring diagram step by step. In the diagram i start form utility pole to the energy meter. So let's do it step by step with examples.

Energy meter wiring

In the above diagram i taken electric supply form utility pole to single phase energy meter and then i get supply to them distribution main board. If you did not know about the energy meter wiring then read the below post
How to wire single phase energy meter?

Double Pole Circuit Breaker

In the main board i first wired the double pole or DP MCB circuit breaker. MCB means Miniature Circuit breaker. If you want learn more about the DP wiring then Click on the below link.
How to wire DP double pole circuit breaker?

Single Pole MCB breaker

In the above distribution board wiring diagram i wired 8 single pole breakers in which some are for low ampere (10A) and some are for high ampere or load which are 20A. If you want to learn about one pole breaker wiring then do click on below post link.
How to wire one pole breaker?

Electrical Cables

For different load we use different types of electrical cables, and in every electrical project we use the cables size regarding the load. For example for Air conditioner we use the 4 mm cable which is very good for this, however if we use 2.5 mm then it's will not good for all time.
In the above diagram i sown electrical cable with it's size in mm in which are 6mm or 8mm, 4mm, 2.5mm and 1.5mm electrical cables.

Electrical Connectors

Connector done his duty very well in E wiring, this the easy and compatible way of getting connection or joints in electrical wiring. My suggestion is that use always connector in main distribution board wiring.

Earth Connection

Earth connection is very important in electrical wiring/ electrical technology. In the above diagram is shown earth symbol and i shown that how to do wiring of earth or earthing. However soon i will write deeply about earthing.

Ampere Meter and CT Coil

Ampere meter is very important in distribution board because this device shown the total current (Ampere) getting the complete circuit or the load of complete circuit. I shown in the above diagram that how to wire a ammeter with CT current transformer, however for better understanding visit the below link.
How to wire ammeter with Current transformer CT coil?
Volt meter / Voltage Meter
I also shown the wiring of volt meter in main D board. In main D circuit breaker board volt meter is very important connection because this make us know about the receiving voltage to circuit. Also read below.
How to wire voltmeter for single phase supply?
Indicator Bulb
This indicators make the main board beautiful and easy to know about receiving electric supply, if the main board supply start the indicator show the supply by glowing bulb.

Message:

I spend a big time in making this post and distribution board wiring diagram and it's just for you guys that you learn some thing clearly, but if i do hard working then it's your responsibility to make this site popular in all over the world by following

5 Wire Ceiling Fan Capacitor Wiring Diagram

5 Wire Ceiling Fan Capacitor Wiring Diagram 

 In this post i am writing about the 5 wire ceiling fan capacitor wiring diagram, in my last post i written about the 3 wire capacitor diagram which we use for fan and can regulate speed by using speed controlling switch. Now in this you will learn about ceiling fan 5 wire capacitor and it's diagram.


5 Wire Ceiling Fan Capacitor Wiring Diagram


 In ceiling fan we use the 5 wire capacitor for speeds, low Med and High speed. On this type of capacitor we have five wire in which two is common and 3 other for different value capacitance micro farad.
In the below diagram i shown a 5 wire fan motor capacitor with it;s capacitor diagram.

 
In the above diagram i shown an image of fan motor capacitor which CBB61 and it's a 5 wire capacitor, the two gray wire are common and red is 4.5 uF 250V and Brown is 6 uF 250 Volts and Purple is 5 micro farad and 250 V.


Ceiling Fan 5 wire Capacitor Working and instillation Diagram for Fan regulating Speed Low, Med, High

 Also read
3 wire ceiling fan capacitor wiring connection diagram
Ceiling fan capacitor wiring diagram
Role of capacitor in ceiling fan or single phase motor

Mostly we use this type of capacitor for speeds, as i told in my above words, so here is an diagram form which you can get idea of using this capacitor. in the below diagram i shown how can we regulate fan speed. Here i shown a diagram in which i shown a ceiling fan main winding / running winding and auxiliary / starting winding with capacitor with speed controller / selector switch and one way switch with low , med and high speed.


In the above diagram i shown AC supply and i connect the neutral wire to motor winding (common winding point) and the phase (Hot wire) connect to the one way switch and form switch connect to the motor main winding and capacitor all wires of capacitance which is 4.5 uF, 4 uF and 6 micro farad. and you can see that speed selector switch on low direction and when it;s switch move on the 5 uF," the ceiling fan will be on med speed and on 6 micro farad the speed will be high. This is an basic diagram of 5 wire ceiling fan capacitor wiring diagram and it's working.
Now if you have an question regarding this post ceiling fan wiring diagram 5 wire capacitor then you can tell me in below comments section.


Voltage Divider

Voltage Divider , in fact is a fundamental circuit in the field of electronics which can produce a portion of its input voltage as output. ...